Instrument Editor
The instrument editor is where you can create custom presets that define how a channel behaves. You can then reuse this preset as many times as you like in your song.
Wave, Noise, and Sample Instruments
There are three types of instruments in WaveTracker, wave instruments, noise instruments, and sample instruments.
- Wave instruments play and manipulate waves from the Wave Bank
- Noise instruments play and manipulate white noise, like TV-static. This is useful for creating simple chiptune percussion.
- Sample instruments play back an audio clip.
Wave and noise instruments hold only envelopes, while Sample instruments have both a sample, and envelopes tab. Although, wave instruments have a few more envelope options than noise and sample instruments.
Envelope Editor
Envelopes are sequences that control elements of the instrument's sound over time. There are 3 envelope types instruments can have, and an additional 5 wave-specific envelopes available for wave instruments.

| Envelope Type | Description |
|---|---|
| All instrument types | |
| Volume | Controls the channel's volume. |
| Arpeggio | Allows you to define arpeggios by offsetting the channel's current note. |
| Pitch | Controls pitch slides, each step in the envelope raises or lowers the pitch of the channel. |
| Wave instruments only | |
| Wave | Sets the wave of the channel from the wave bank. |
| Wave Blend | Blends the current channels wave with the next one in the wave bank. |
| Wave Stretch | Stretches the channel's current wave from the center outwards for a kind of pulse width modulation effect. |
| Wave FM | Performs frequency modulation using the channel's current wave as the carrier and the next wave in the wave bank as the modulator. |
| Wave Sync | Repeats the channel's wave multiple times during the wave's cycle. |
Editing
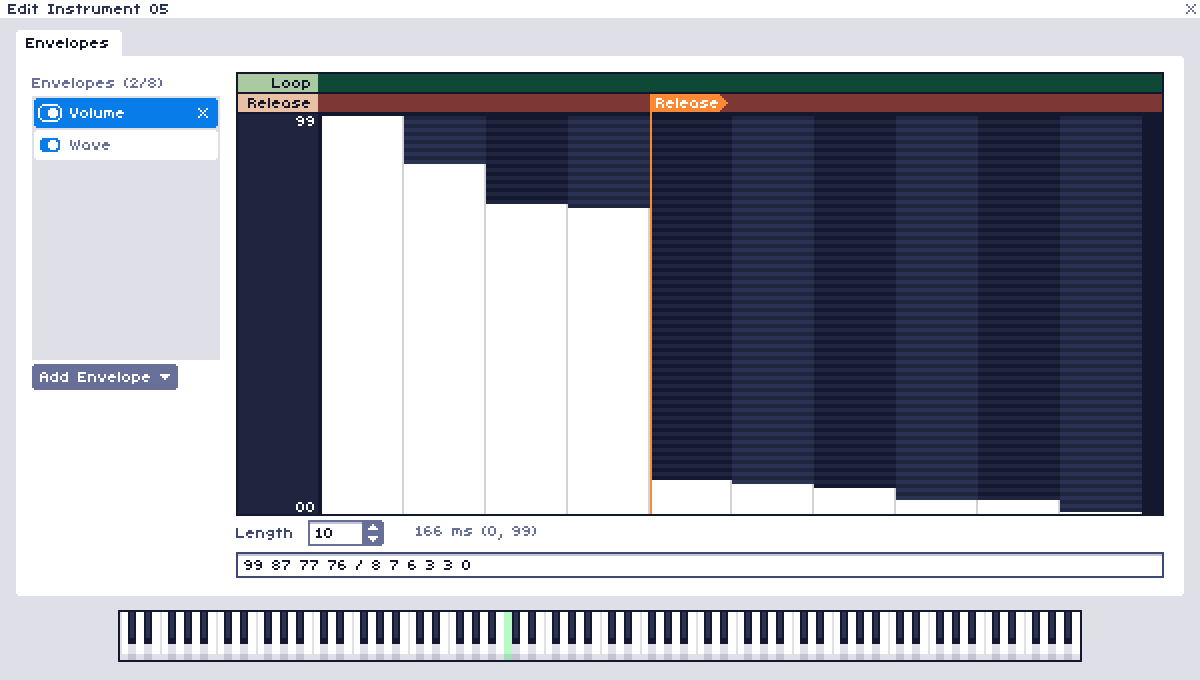
Envelopes can be added by selecting them from the 'Add Envelope' button. To delete the envelope, click the 'X' to the right of the envelope's name. Toggle the switch to the left side of the envelope to temporarily enable/bypass the envelope.
To edit an envelope, first set the length of the envelope with the Length control, then draw the envelope's contour in the grid, by clicking and dragging. Hold Shift while drawing to create straight lines. Envelopes can also be typed in manually via the text box below the draw area.
Loop and Release
The two ribbons at the top of the envelope editor are where you can set flags for loop points and release points in the envelope. To add a flag, click any point along the ribbon where the flag should be. Click the point again to remove it.
If the envelope has a release, the envelope will play up until the release point, and wait there until a Note Release (===) is triggered from the pattern editor. If the envelope has a loop point before a release point, it will loop that section until the envelope is released. If the loop point is afterwards, it will loop that portion indefinitely.
Loops and releases are represented in the envelope text box as '|' and '/', respectively.
Sample Editor
The 'Sample' tab is only available on sample instruments. It allows the import of any .wav, .flac or .mp3 file into an instrument. They can then be used in the pattern and will be repitched to whatever note is being played.

Clicking 'Import Sample' will open a file browser dialog, allowing you to navigate to the location of the file you would like to sample. Choosing a file will load it into the sample editor.
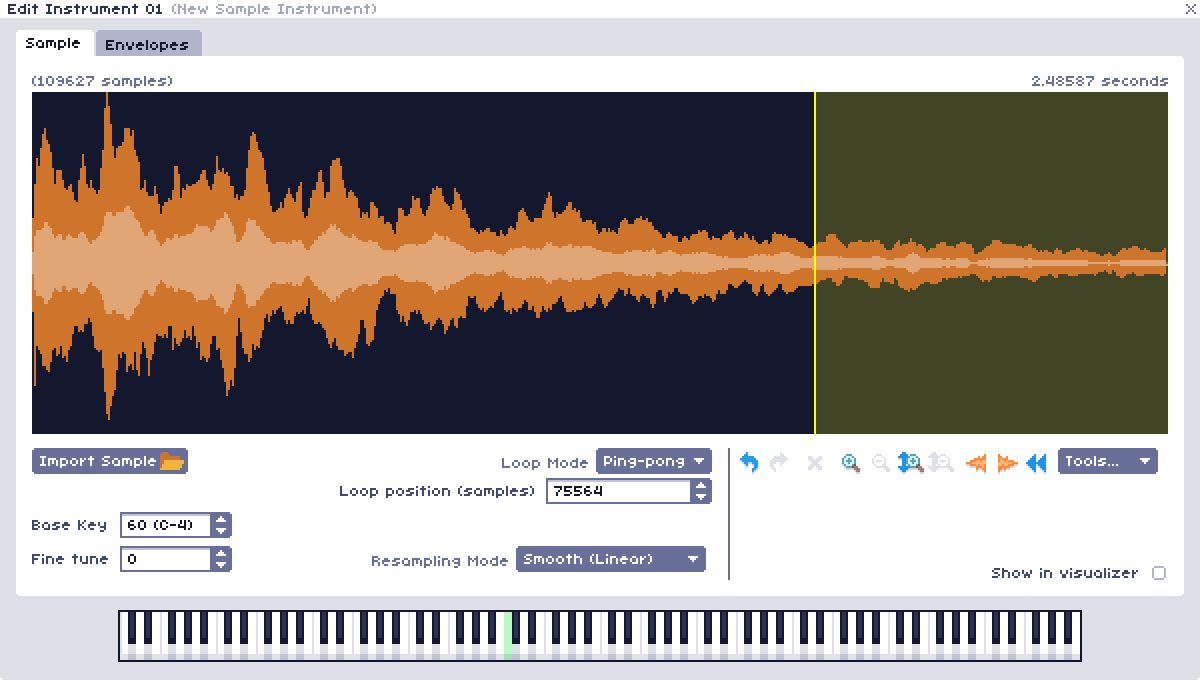
Above the sample editor is the length of the audio, in digital audio samples, and in seconds.
Below the sample are some settings specific to the sample.
| Setting | Description |
|---|---|
| Base key | Use this to transpose the sample up or down so that the note played matches the note heard. |
| Fine tune | Detunes the sample up or down in cents. |
| Loop mode |
Defines how the sample should loop, if at all:
|
| Loop position | This option is only visible when the loop mode is set to Forward or Ping-pong. Allows you to set the exact position of the loop point in digital audio samples. This can be useful to find the nearest zero-crossing to avoid clicking at the loop point. |
| Resampling mode |
Defines how the sample should be interpolated when played at different pitches
|
Looping
By default samples are set to the One-shot loop mode. To make a sample loop at the end, the loop mode needs to be either Forward or Ping-pong.
When looping is enabled, the looping portion of the sample will be highlighted yellow. The loop point can be set with the 'Loop position' number box. Below the loop mode dropdown. Alternatively, an easier way to set the loop point is to Shift+Click the point along the sample where the loop point should be. This will automatically create a loop point at that location. The loop point can also be set by right clicking the sample and selecting 'Set loop point'.
Editing
The right-most section of the sample editor contains editing functions with which to modify the sample:
| Button | Description |
|---|---|
| Undo | Undo the last action. |
| Redo | Redo the last undone action. |
| Delete | Removes a selected portion from the sample. |
| Zoom in | Zooms in the view of the sample. |
| Zoom out | Zooms out the view of the sample. |
| Zoom in (vertical) | Expands the view of the sample vertically, to better see low volume sections of the sample. |
| Zoom out (vertical) | Shrinks the view of the sample vertically. |
| Fade in | Makes the sample or selection gradually get softer until it reaches silence at the very end. |
| Fade out | Makes the beginning of the sample or selection silent, and gradually become louder. |
| Reverse | Reverses the sample or selection so that it plays backwards. |
Regional selections can be made by clicking and dragging over the sample. If a portion of the sample is highlighted, then the tools will affect only the selected region.
| Tool | Description |
|---|---|
| Delete | Removes a selected portion from the sample. |
| Fade in | Makes the sample gradually get softer until it reaches silence at the very end. |
| Fade out | Makes the beginning of the sample silent and gradually become louder. |
| Reverse | Reverses the sample so that it plays backwards. |
| Invert | Flips the polarity of the sample |
| Normalize | Makes the sample have maximum amplitude so there is no wasted headroom. By default all samples are normalized upon import. This can be turned off in Preferences. |
| Remove DC offset | Centers the sample on the x axis. This can help remove unwanted distortion within the broader mix. |
| Mix to mono | Takes a stereo sample and mixes the left and right channels together into one mono channel. |
| Amplify | Change the amplitude of the sample by a certain number of decibels. |
| Bitcrusher | Bitcrushes the sample by downsampling it and/or changing the bit depth. |
Saving a sample
Samples can be exported to the disk by right clicking the sample and selecting 'Export...' This will prompt a dialog to choose a location and filename, then save it as a 32-bit .wav file.