Wave Editor
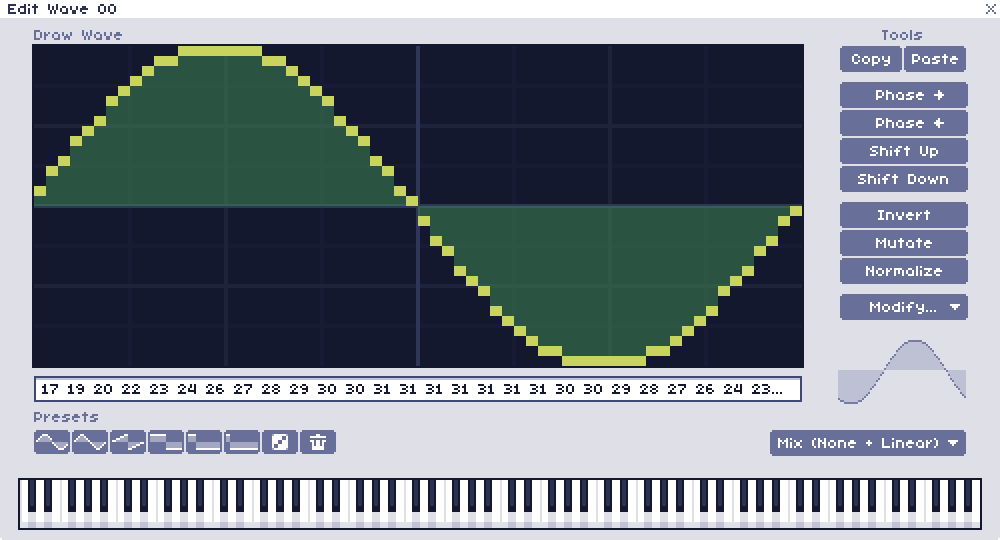
The wave editor allows you to change qualities of the currently selected wave. Pushing the left or right arrow keys will cycle through the waves in the bank, so you can easily switch between editing different waves.

Draw Wave
Clicking in this area will allow you to draw any wave shape in a 64x32 box. Holding shift while doing this will let you draw straight lines. This is useful for creating square, sawtooth or triangle-like waves with straight edges.
Below is a text box with a string of numbers. These numbers correspond to each sample that describes the wave, and is a way that the wave can be stored or shared outside of WaveTracker. Double clicking this will let you edit or copy its contents.
Presets
There are 8 different presets to choose from. Sine, Triangle, Sawtooth, 50% pulse, 25% pulse, 12.5% pulse, Randomized, and Clear (Resets the wave to be blank). Clicking any one of these will overwrite what was in the wave canvas with the preset.
Tools
These can be used to modify the shape of the wave, or copy and paste from one wave to another. Below is a moving preview of how the wave looks in motion.
| Tool | Description |
|---|---|
| Copy | Copies this wave to an internal clipboard. |
| Paste | Pastes the wave copied. |
| Phase > | Moves all points in the wave one space to the right, with the last looping back to the front. |
| Phase < | Moves all points in the wave one space to the left, with the first looping around to the back. |
| Shift up | Moves all points in the wave one space up, stopping at the top. |
| Shift down | Moves all points in the wave one space down, stopping at the bottom. |
| Invert | Flips the polarity of the wave. |
| Mutate | Adds slight randomization to the wave, making it sound brighter and altering the timbre. Clicking repeatedly will further mutate the wave. |
| Normalize | Makes the wave have a maximum amplitude, useful if you've smoothed a wave but want to bring it back to full volume. |
Wave Modifications
The modify button offers a selection of more advanced operations to perform on the wave. These will open a special dialog to adjust and preview settings before applying them.
| Tool | Description |
|---|---|
| Smooth | Smooths out sharp corners in the wave. 'Window Size' controls the coarseness of the smoothing. 'Amount' controls how much smoothing to apply. |
| Add fuzz | Adds a random offset to each point for a brighter tone. 'Amount' controls how much to add. 'Wrap around' will make points move back towards the center if they reach the maximum or minimum of the window |
| Sync | Repeats the wave inside itself. 'Harmonic' controls how many times to repeat. |
| Sample and hold | Basic downsample effect, turns the wave into a more staircased pattern. 'Hold length' controls how long each step is. |
| Math expression |
Allows you to define a wave via a mathematical expression. 'Wave folding' causes values to
wrap around should they go beyond the maximum.
Built-in functions and variables:
|
Resampling Filter
Each wave can use one of 3 different resampling modes, which affects how the wave sounds in different registers.
| Resampling Mode | Description |
|---|---|
| Harsh | No interpolation, uses nearest neighbor resampling. This gives a very bright and crunchy digital sound. |
| Smooth | Linear interpolation. This gives a smoother, darker sound. |
| Mix | A mix between the harsh and smooth modes. Provides a compromise that will make sloped sections of the wave smoother, while preserving the clarity of the sharper portions at low frequencies. This is the default option for any new waves, unless otherwise changed in preferences. |
To see how each resampling mode affects the wave's output, right click on the draw area and select 'Show as line'.